How To Shoot Down and Uphill: Bullet Trajectory
What you should know about angled shooting. Making precise shots when shooting uphill or downhill is no longer a dark art. It has become a science.
Since the advent of laser rangefinders, ballistic applications, precision rifles, and riflescopes, riflemen have been able to better predict bullet trajectory. This article will show you some of the most useful tools for shooting on hills and in the valleys.
Let’s first touch on some basic physics to dispel old myths and understand the forces at work when projectiles speed up.
Introduction
Angle shooting is a subject that’s often misunderstood. Many riflemen make the mistake of believing the angle to be greater than what it is. The angle of this rifle is 18 degrees.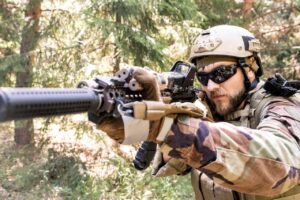
In the past, many people believed that a shot taken uphill would result in a high-impact bullet, while a shot downhill would produce a low-impact bullet. This notion is no longer true. Gravity exerts the greatest influence on bullets when their path is perpendicular and level to earth’s pull.
Gravity has a greater effect when a bullet is flying at an angle. This does not change the projectiles’ path much, but it can have a significant effect on its velocity. The trajectory is less “bent” towards the earth and so the bullet follows a more straight path. What’s the takeaway? When shooting down or, bullets are fired high.
Shooters of all levels tend to underestimate angles. It’s not uncommon to see old-school gunmen who have been shooting for decades squint and declare that a slope is steep, say 30 degrees, when it really only measures 15 degrees.
The tools and understanding required to accurately compensate for angles have improved as precision rifles have been introduced, along with laser rangefinders.
It’s not magic to compensate for shooting uphill or downhill, but it is important to know the exact angle. There are many different ways to measure angle, from smart phone apps to scope mounted gadgets to laser rangefinders. Soon, we’ll look closer at the various tools for estimating angles.
After measuring the angle you need to determine how that angle affects your bullets point of impact.
True Ballistic Distance
Calculating the true ballistic distance, which is simply the horizontal distance you have between yourself and your target is a very easy way to do this. You can calculate the horizontal distance from your target if you are good with math. We’ll get to that in a moment.
You can dial in your horizontal distance or just hold it over. Assuming you have a rifle that is accurate and the shot was executed correctly, your aim will be hit.
A much easier and more efficient way to accomplish this is to use a rangefinder provided with an internal calculator that runs the numbers for you, and spits out the TBR. With your laser rangefinder set to produce TBR, calculating your correct holdover is as simple as ranging the target, dialing or holding for the TBR rather than the actual distance to the target, and shooting.
The process is effective for both downhill and uphill shots, and can be used to shoot at an angle of 65 degrees. It’s the fastest and easiest way to achieve this.
Angle Indicators and Cosines
What happens if the rangefinder does not calculate TBR and provides it? First, you need to get a measuring device. Angle indicators mounted on rifle scopes, also known as angle cosine indicator are very popular with precision long-range riflemen. As with all equipment, the quality is determined by price. The best ones cost over $100.
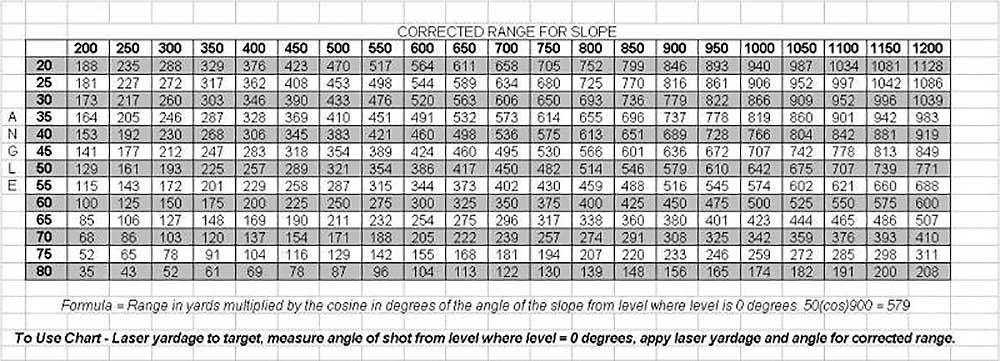
You can use this angle to determine your range. Multiply it by the distance you want in yards and then multiply that number back. Reference numbers are provided in the accompanying charts. If the angle of the shot is 35 degrees then the cosine value is 0.819. You can multiply your distance — let’s say, 700 yards — by 0.82. Hold your reticle at 574 yards and dial or hold. This is a slow, accurate and effective method.
Cosine can be viewed as a simple percentage of distance, and that is what it is. If your angle gauge reads near 20 degrees, the cosine percentage (0.940%) would tell you to aim for 94 per cent of actual distance.
Let’s keep it simple and say your distance to the target is 1000 yards. Shoot after holding for 940 yard, which is 94 percent, of the distance. For most distances, you will need to do more math. If your rangefinder shows 862 yards with an angle of 50 degrees (cosine 0.64) you may have to use a calculator unless you are a math genius. You can get the shoot-to range by multiplying 862 yards with.64.
Here’s a chart, courtesy of the SAAM shooting school at the FTW ranch, showing angle cosine/actual-distance percentages:
Angle/Degree Cosine Multipler
Multiplication of measured yards by the degree of angle
- 5 – 99 or 99%
- The 10th decimal place is.98, or 98%
- The 15-96 percent or 96%
- The 20-.94% or 94%
- 25% – 91%
- The 30th percentile is.87, or 87%
- The 35-.82 percent or 82%
- 40% – 0.77 or 77%
- The range of 45-.70 or 70%
- The 50-64 percentile or 64%
- The 57% or 55-57-% range is a value between 55 and.57.
- 60% – 50%
- The 65-.42 or 42 percent rate is a good place to start.
- 70% – 0.34 or 34%
- The difference between 75 and.26 is 26%
- The 80-.17 or 17% rate is a good estimate.
- 85-.09 or 9.0%
- 90% – 0.00 or 0%
Angles become more prominent as distance increases.
You can see that the bullet impact point is not affected by angles until they are quite severe. You have to be shooting at an extremely steep angle within 300 yards before it becomes a problem. Take this example: If you are taking a shot at a deer that has a vital area of 10 inches on a 30 degree angle, you can quickly calculate the distance by multiplying 300 times cosine percent (0.87). This will give you 261 yards.
Between 260 yards and 300 yard, a common.30 06 load with 165 grain Nosler ballistic tip bullets impacts a fraction more than 3 inches. Even at a steep 30-degree angle, you’ll still be able to hold center of vitals.
Angle becomes more important as distance increases. Even though very long shots rarely occur at an acute angle, we’ll use a 600 yard shot at 30 degrees for argument purposes. Calculating (600 yards divided by 0.87) gives a distance of 522 yards. The difference in impact between 520 and 600 yards is about 25 inches, which is more than acceptable for an on-target shot.
Consider the extreme example of an uphill or downward shot that mountain goat, bighorn sheep, or even mule deer hunter may encounter. Imagine your target animal has been sleeping at the bottom of a huge cliff all day and you have spent the entire morning climbing around to get above it. This distance of 450 yards is well within an experienced rifleman’s ethical range with a precise rifle.
The angle, however, is nearly vertical and to go downhill, you have to hang literally over the edge of the cliff. You anchor yourself to a boulder nearby, drape down, with your heart in the throat and measure the angle of an animal below you. It’s about 80 degrees. You multiply 450 yards by 0.17% cosine of 80 degrees to get 76 yards, which is the TBR.
This is where things get tricky. Gravity won’t pull the bullet down at 200 yard’s line of sight if you have your rifle set up at 200 yards. Your point of impact at 75 yards is usually 1.30 inch high. The bullet will continue to deviate from the line of vision and hit higher than expected.
You’d still be fine if your rifle’s sighting was set up to direct the bullet in an exact parallel line to your line-of-sight. However, this would not be practical for most shots, especially those that are almost level, where gravity is a significant factor in the bullet’s trajectory.
When under pressure and time constraints, most hunters will hold their rifles low to the ground and try a difficult shot. Most of the time, this is not enough and a rodeo full of misses and swear words follows.
In situations like these, a smartphone with an app that can calculate ballistics is invaluable. The app will calculate the exact location of your shot based on where your rifle has been sighted and what angle you are shooting at. If you zero your rifle at 200 yards and shoot at an angle of 80 degrees, the point of impact at 450 yards will still be 13 inches above your crosshairs. Really.
Mobile Apps for Angles
If your app offers this feature, you can also use it to determine whether your shot is going uphill or downhill. Add another app if it does not. I have the “Ballistic” $10 version, which allows me to measure an angle by laying my iPhone flat on top of the elevation turret of my scope or the top of the barrel where there isn’t much taper.
After measuring, I tap on the Calculate button and my phone produces holdover that includes the calculated angle. This method is accurate, but it takes time. It takes time to do this. You have to put the target into your crosshairs. Then, you need to open your app on your phone and read the angle. Next, you position the rifle and lock the reading. Finally, the calculation is run.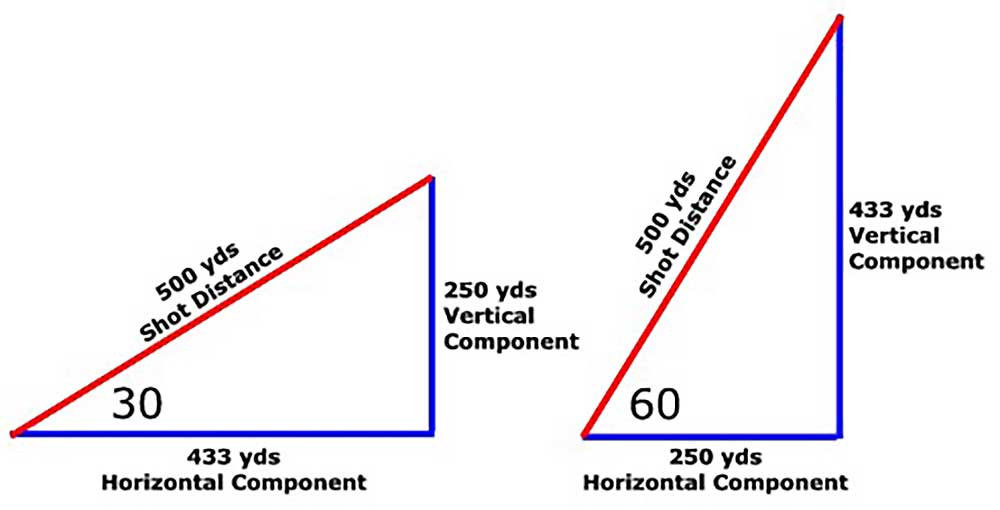
If you want to get the perfect shot, then you need to take advantage of the time you have. Don’t let your phone fall off the edge.
If you like to hunt or shoot recreationally in broken terrain, shooting at an angle can be challenging. It can be rewarding to accept the challenge, and develop the necessary skills. Use a method you are comfortable with, such as a rangefinder which calculates the TBR or a rifle mounted with an angle/cosine meter and charts for accurate calculation.
You’ll need to get out and about if you live on a flat land. In the West, rough public land is perfect. Shoot at the targets you see, and become proficient in your shooting system.
Understanding how to shoot uphill and downhill can give you a competitive edge and is much safer.

